
Nothing kills the joy of a pinball session faster than a dead flipper, a stuck ball, or mysterious scoring issues. Whether you own a classic electromechanical machine or a modern solid-state marvel, malfunctions are inevitable. The good news? Most problems can be diagnosed and fixed with systematic troubleshooting. This guide walks you through proven steps to identify common issues, restore optimal performance, and keep your machine running smoothly for years to come.
Table of Contents
- Key takeaways
- Prepare your workspace and tools for effective troubleshooting
- Step 1: visual and mechanical inspection
- Step 2: electrical testing and switch matrix troubleshooting
- Step 3: flipper troubleshooting and mechanical rebuilds
- Discover quality pinball machines and expert resources
- FAQ
Key Takeaways
| Point | Details |
|---|---|
| Unplug before inspection | Always disconnect power to the machine and verify there is no current flowing before you begin any checks. |
| Visual and mechanical check | Begin with a thorough visual survey and mechanical inspection to catch obvious problems before energizing the machine. |
| Step by step electrical tests | Use progressive electrical tests and refer to schematics to confirm voltages, continuity, and resistance align with expected values. |
| Flipper switch matrix power | Prioritize testing the flipper mechanisms, the switch matrix, and the power supply as they are common fault sources. |
| Preventive maintenance saves time | Regular preventive maintenance and stocking common parts reduce repair delays and extend machine life. |
Prepare your workspace and tools for effective troubleshooting
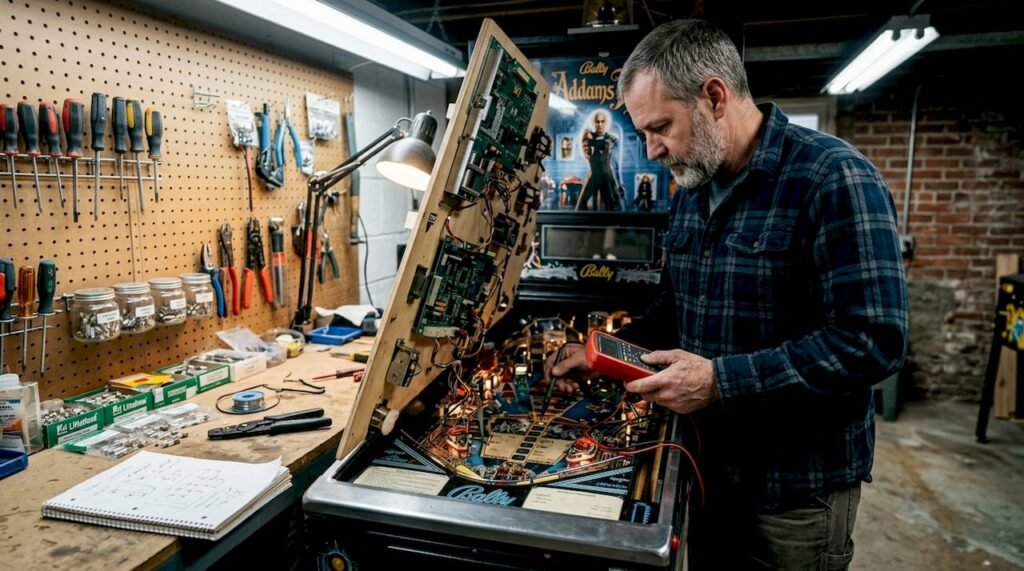
Before diving into diagnostics, proper preparation saves hours of frustration. Standard troubleshooting methodology begins with safety: unplug the machine completely and verify no power flows to any component. This single step prevents electric shock and protects sensitive circuit boards from accidental shorts during inspection.
Gather your essential toolkit. A digital multimeter (DMM) is non-negotiable for testing voltage, continuity, and resistance. You’ll need nut drivers in various sizes (typically 1/4", 5/16", 11/32", and 7/16") to access playfield components and backbox assemblies. A quality soldering iron with temperature control handles wire repairs and component replacement. Keep contact cleaner specifically designed for electronics on hand, but never use WD-40 on electrical contacts as it leaves residue that attracts dirt and causes future failures.
Stock replacement parts before you need them. Fuses blow at inconvenient times, so maintain a selection matching your machine’s specifications. LED or incandescent bulbs, switch blades, leaf switches, and common diodes (1N4004 or 1N4007) should be in your spare parts bin. Having these ready eliminates delays when you identify a failed component.
Create an organized workspace with excellent lighting. A headlamp or adjustable work light illuminates tight spaces under the playfield. Use small containers or magnetic trays to organize screws, nuts, and tiny parts during disassembly. Label wires with tape or take detailed photos before disconnecting anything. This documentation becomes invaluable during reassembly, especially when working on complex wiring harnesses.
Pro Tip: Keep a notebook dedicated to your machine. Document every repair, adjustment, and component replacement with dates. This maintenance log helps identify recurring issues and tracks the lifespan of rebuilt assemblies.
Essential troubleshooting tools
| Tool Category | Specific Items | Purpose |
|---|---|---|
| Testing equipment | Digital multimeter, test leads | Measure voltage, continuity, resistance |
| Hand tools | Nut drivers (1/4" to 7/16"), screwdrivers, needle-nose pliers | Access and adjust components |
| Soldering supplies | Temperature-controlled iron, rosin core solder, desoldering braid | Repair connections and replace parts |
| Cleaning materials | Electronics contact cleaner, cotton swabs, soft brushes | Remove oxidation and debris |
| Documentation | Camera or smartphone, notebook, labels | Record configurations and track repairs |
Understanding pinball machine parts helps you communicate issues clearly and order correct replacements when needed.
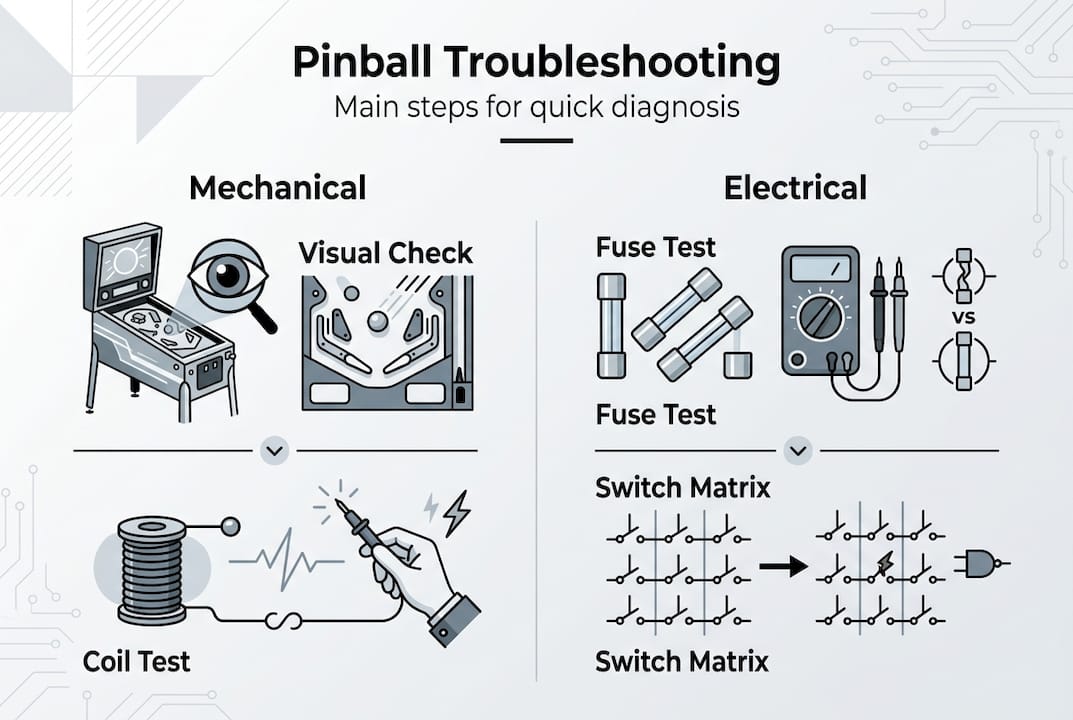
Step 1: visual and mechanical inspection
With the machine unplugged, begin your investigation with a thorough visual survey. Perform a visual inspection for burnt coils, loose wires, damaged plastics, and worn playfield elements before applying power. This systematic approach catches obvious problems that could worsen or create safety hazards when energized.
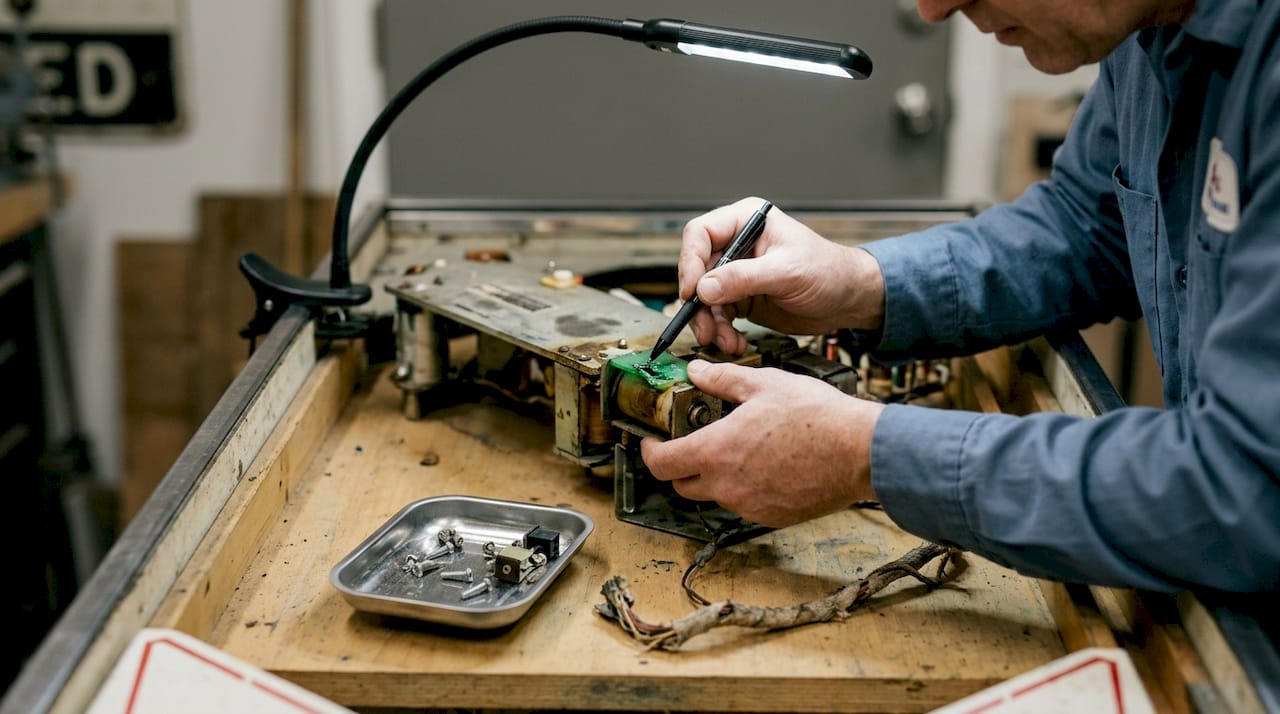
Start with the coils. Examine each solenoid for discoloration, melted plastic sleeves, or burn marks on the windings. A coil that overheated leaves unmistakable evidence: blackened wire insulation, melted mounting brackets, or a distinct burnt smell. Check the coil stops (the metal plates that limit plunger travel) for proper positioning and wear. Bent or missing stops allow excessive plunger movement, leading to coil damage.
Inspect all wiring connections methodically. Wiggle connectors gently to verify they’re fully seated. Look for green corrosion on pins, frayed insulation, or wires pulled partially out of crimp terminals. Jones plugs (the large multi-pin connectors between playfield and cabinet) are common failure points. Remove and examine each one for bent pins, corrosion, or burn marks indicating high resistance.
Survey the playfield surface and components. Cracked plastics, worn rubber rings, and loose posts affect ball travel and switch activation. Check bumper skirts for proper alignment and secure mounting. Inspect ramps and wire guides for breaks or misalignment that could trap balls. Examine the playfield itself for worn areas where ball impact has removed clearcoat or created divots.
Test fuses with your multimeter set to continuity mode. A good fuse shows zero resistance; a blown fuse shows infinite resistance (open circuit). Verify each fuse matches the correct amperage rating marked on the board or in the manual. Installing higher-rated fuses to “fix” blown fuses masks underlying problems and risks catastrophic damage.
For electromechanical machines, inspect score reels and stepper units without power. Rotate reels by hand to verify smooth movement. Check for bent fingers, broken springs, or accumulated dirt preventing proper advancement. Examine relay contacts for pitting or carbon buildup that prevents reliable closure.
Only after confirming all mechanical components appear sound should you consider powering up the machine for electrical testing. This disciplined approach prevents turning a simple problem into an expensive disaster.
Pro Tip: Take close-up photos of complex assemblies before disassembly. Zoom in on switch stacks, relay banks, and connector orientations. These reference images eliminate guesswork during reassembly and help identify changes if someone worked on the machine previously.
Visual inspection checklist
- Verify machine is unplugged and discharge any capacitors
- Examine all coils for burn marks, damaged sleeves, or bent stops
- Check wiring for loose connections, corrosion, or damaged insulation
- Inspect Jones plugs and other connectors for bent pins or burn marks
- Survey playfield plastics, rubbers, posts, and ramps for damage
- Test all fuses with multimeter and verify correct amperage ratings
- For EM machines, manually operate score reels and steppers
- Document any issues found before proceeding to electrical testing
Many owners find that best pinball machines for arcades are designed with serviceability in mind, making inspections more straightforward.
Step 2: electrical testing and switch matrix troubleshooting
With mechanical inspection complete, shift focus to electrical diagnostics. Check fuses, clean connectors, and test switches using systematic isolation techniques to pinpoint circuit failures. Power supply issues affect every system, so verify stable voltage output before investigating specific problems.
Measure power supply voltages with your multimeter. Solid-state machines typically provide +5V for logic circuits, +12V for displays and drivers, and higher voltages (often 20V to 50V) for solenoids and lamps. Compare your readings against specifications in the manual. Voltage more than 5% outside spec indicates power supply problems requiring immediate attention. Check for ripple voltage (AC component in DC output) that suggests failing filter capacitors.
Clean and inspect all connectors thoroughly. Remove Jones plugs and spray both male and female sides with electronics contact cleaner. Use a small brush or cotton swab to remove oxidation from pins. Reinsert connectors firmly and verify secure locking. Lamp sockets accumulate carbon and corrosion; clean each socket and verify good spring tension on contacts. Coin door switches often fail due to dirty contacts; disassemble, clean with contact cleaner, and adjust for proper actuation.
For electromechanical machines, stepper units and relays require special attention. Adjust stepper pawls so they engage teeth cleanly without binding. Clean relay contacts with a business card (never sandpaper, which leaves conductive particles). Verify relay coil resistance matches specifications. Adjust contact gaps according to service manual specifications, typically around 0.030 inches.
Switch matrix troubleshooting requires methodical testing. Enter switch test mode (also called edge test on some systems) to monitor individual switch closures. Press each switch and verify the display registers the correct switch number. Ghosting (multiple switches registering from one closure) or dead switches indicate matrix problems.
Isolate matrix failures by understanding the circuit. Switches are arranged in rows and columns. Each switch has a blocking diode preventing current backflow. To test, carefully jumper a known good column to each row at the switch location using a diode (1N4004) oriented correctly. If the switch registers, the problem is the switch itself or its diode. If it doesn’t register, trace the column or row wire for breaks or bad connections.
Verify diode orientation carefully. The cathode (banded end) must face away from the switch toward the matrix column wire. Reversed diodes create phantom switch closures and erratic behavior. Test suspect diodes out of circuit using the diode test function on your multimeter. A good diode shows approximately 0.5 to 0.7 volts in forward bias and infinite resistance in reverse bias.
Check wiring continuity from switches to driver boards. Broken wires under the playfield are common, especially where harnesses flex during playfield removal. Use your multimeter to verify zero resistance from switch terminal to the corresponding connector pin at the driver board.
Common electrical issues and tests
| Problem | Test Procedure | Likely Cause |
|---|---|---|
| No power | Check AC input, measure transformer outputs | Blown line fuse, failed transformer |
| Erratic behavior | Measure power supply ripple voltage | Failing filter capacitors |
| Dead switches | Test matrix rows and columns for continuity | Broken wire, bad connector |
| Ghost switches | Verify diode orientation and condition | Reversed or shorted diode |
| Dim or flickering lamps | Clean sockets, test voltage at socket | Dirty contacts, bad connection |
| Weak or dead coils | Measure coil resistance, check driver transistor | Open coil winding, failed driver |
Understanding proper handling techniques like how to move a pinball machine prevents wiring damage during transportation or playfield removal.
Step 3: flipper troubleshooting and mechanical rebuilds
Flipper issues like stuck or weak power stem from mechanical failures or electrical problems. Systematic diagnosis identifies whether the issue is mechanical binding, switch misadjustment, or failed electrical components. Regular rebuilds prevent catastrophic failures during gameplay.
Determine if the problem is mechanical or electrical. With power off, manually move each flipper through its full range. Flippers should return smoothly to rest position via spring tension. If a flipper sticks in the up position without power, you have a mechanical problem: worn bushings, bent linkages, or insufficient return spring tension. If flippers move freely when off but are weak or dead when powered, suspect electrical issues.
Check End of Stroke (EOS) switch adjustment first. The EOS switch controls when the flipper transitions from strong hold coil to weaker hold winding. Raise the flipper to full extension and measure the gap between the switch blade and actuator. This gap should be approximately 1/16 inch (about the thickness of a nickel). Too large a gap delays EOS opening, causing weak flippers and overheating hold windings. Too small a gap causes flippers to drop immediately after activation.
Inspect coil diodes on the flipper assembly. Each flipper coil has a diode across its terminals to suppress voltage spikes. Test these diodes with your multimeter. A shorted diode causes the flipper to stay energized continuously (stuck up). An open diode may allow the flipper to work but causes excessive voltage spikes that damage driver transistors or FETs.
Check driver board components if diodes test good. Flipper drivers use high-current transistors (older machines) or MOSFETs (modern machines) to switch coil current. These components fail from age, overheating, or voltage spikes. Testing requires some electronics knowledge; consult your service manual for specific driver board troubleshooting procedures. If both flippers fail simultaneously, check the common fuse before investigating individual drivers.
Schedule regular mechanical rebuilds every few years depending on play volume. A complete flipper rebuild includes replacing coil sleeves, plunger assemblies, EOS switches, return springs, bushings, and flipper bats. Install new coil stops to prevent plunger overtravel. This preventive maintenance costs far less than emergency repairs and keeps flippers feeling crisp and responsive.
Clean and lubricate flipper mechanisms during rebuilds. Remove old grease and dirt with solvent. Apply a thin coat of high-quality synthetic grease to bushings and pivot points. Avoid over-lubrication, which attracts dirt and causes sluggish operation. Never lubricate switch contacts; use contact cleaner only.
Pro Tip: Keep a flipper rebuild kit specific to your machine model in stock. These kits include all wearing parts and cost less than buying components individually. Having parts ready means you can complete a rebuild in one session rather than waiting for shipments.
Flipper troubleshooting decision tree
- Flipper stuck up with power off → Mechanical binding, worn bushings, or weak return spring
- Flipper stuck up with power on → Shorted coil diode or failed driver (stuck closed)
- Weak flipper → EOS switch gap too large, worn coil, or weak power supply voltage
- Flipper drops immediately → EOS switch gap too small or switch contacts welded closed
- Both flippers dead → Check common fuse, power supply, and cabinet flipper button switches
- Single flipper dead → Test coil resistance, diode, driver transistor, and wiring continuity
Quality machines like those detailed in pinball machine parts guides use robust flipper assemblies designed for thousands of activations.
Discover quality pinball machines and expert resources
Troubleshooting skills keep your current machine running, but sometimes you’re ready to expand your collection or upgrade to a more reliable platform. Premium Pinballs offers a curated selection of arcade-quality machines, from classic titles to modern masterpieces, all backed by expert knowledge and support.

Explore best pinball machines for arcades to discover models engineered for high-volume play and easier maintenance. These machines incorporate design improvements that reduce common failure points. Deepen your technical knowledge with comprehensive guides on understanding pinball machine parts, helping you identify components quickly during future repairs. Consider why buy refurbished pinball machines as cost-effective alternatives that have undergone professional restoration, eliminating many of the issues covered in this guide. Premium Pinballs provides the machines, parts, and expertise to support your pinball journey.
FAQ
How do I know if my flipper coil needs rebuilding?
Weak or inconsistent flipper action signals worn components even if the flipper still functions. If flippers feel mushy, fail to catch balls cleanly, or stick mechanically when powered off, schedule a rebuild. Inspect coil sleeves for cracks, check plunger surfaces for pitting, and verify bushing play doesn’t exceed specifications.
What safety precautions should I take before troubleshooting my pinball machine?
Always unplug the machine completely before opening the cabinet or lifting the playfield. Wait several minutes for capacitors to discharge, especially on older power supplies. Wear safety glasses when working under the playfield to protect against falling debris. Never spray WD-40 or similar lubricants on electrical contacts, as they leave conductive residue that causes future failures.
How can I identify a switch matrix problem?
Enter switch test or edge test mode and systematically press every playfield switch. Dead switches, multiple switches registering from one press (ghosting), or switches that register without being pressed indicate matrix issues. Check diode orientation at problem switches, clean switch contacts thoroughly, and verify wiring continuity from switch to driver board.
Why is regular maintenance important for my pinball machine?
Preventive maintenance catches small problems before they cascade into expensive failures. Regular cleaning removes dirt that causes switch failures and coil overheating. Scheduled flipper rebuilds prevent catastrophic breakage during gameplay. Inspecting wiring and connectors identifies developing issues while they’re still easy to fix. Machines receiving consistent maintenance play better and require fewer emergency repairs.
What causes a pinball machine to blow fuses repeatedly?
Repeated fuse failures indicate an underlying short circuit or overload condition that must be identified and corrected. Common causes include shorted coils (test resistance), failed driver transistors stuck closed, pinched wires creating shorts to ground, or incorrect fuse ratings installed previously. Never install higher-rated fuses to “solve” the problem, as this risks catastrophic damage to circuit boards and wiring. Systematically disconnect circuits protected by the failing fuse to isolate the fault.
How do I maintain switch reliability over time?
Clean switch contacts every six months using electronics contact cleaner and a business card to remove oxidation. Adjust switch gaps to factory specifications, typically 0.030 to 0.040 inches depending on switch type. Replace worn switch blades that show pitting or carbon buildup. Verify mounting screws are tight, as loose switches cause intermittent contact. For high-traffic switches, consider installing opto sensors as replacements to eliminate mechanical wear entirely.
Recommended
- How to handle your pinball purchase checklist – Pinball Machines for Sale – Premium Pinballs LLC
- understanding pinball machine parts – Pinball Machines for Sale – Premium Pinballs LLC
- A Guide to Key Pinball Cabinet Features – Pinball Machines for Sale – Premium Pinballs LLC
- Pinball machine terminology explained for enthusiasts